Wednesday, 6 May 2015

Rinnai RD-600CG gas dryer cleaning

I have this Rinnai RD-600CG gas dryer from City Gas since 2007. It is almost 8 years old and had replaced the capacitor and the rubber belt 1 year ago. I clean the filters after each drying session. Our clothes have fibers that will dislodge and will be trapped by the filters. Even after many washings and dryings, you will still see the lint on the filters. You will see plenty of lint when you are drying towels.

After one wash, the typical amount of lint is shown below. Hot air will flow through the filters and the lint will be trapped on them. If the lint is not removed, the air flow will be blocked and the drying process will take longer. There are two filters in the gas dryer. In fact, there is another filter which is on the outside of the dryer. This one is for the air inlet to the dryer. You will need to clean this filter which is underneath the gas dryer.

Filters in the gas dryer
Remove the cover (with the movable filter) by your fingers. You need to pull the cover towards you and the cover will come off. 
Remove the filter cover
There is another filter behind the removable filter. 
Lint trapped in the gas dryer
The lint is quite difficult to remove by your fingers. There is a trick that I used and that is to wet your fingertips with water and you can easily remove the lint using your wet fingers. Just rub it around the filter and the lint will accumulate into a small crumb or ball. 
Lint trapped on the removable filter (rotating)
Remove the lint using fingers
Removable filter cleaned
Again, using your wet fingers, you can easily remove the lint from the fixed filter. A lot of people did not realize that you need to remove the lint from this filter. The instruction manual said that you need to clean this periodically but I think you need to clean this after each use. You can see that after removing the lint, the holes for the air outlet are clearly visible and not blocked. This will reduce the drying process time.
Cleaning the fixed filter in the gas dryer
Fixed filter cleaned
After the removable filter has been cleaned, you need to assemble the filter back to the cover. The orientation of the filter is important. The Chinese character "後" on the filter means "back" or "behind". So this side with the Chinese character or the PP should be facing you and when you put the cover back the Chinese character or the PP should face the fixed filter. I have never put it wrongly so I don't know what is the effect of it if it is in the wrong way.
Put back the removable filter onto the cover (note the side)
Filters cleaned
Filters cleaned
It is always better to clean the filters after each cycle of drying. I notice that the drying cycle gets longer if the lint is not removed. The drying process requires dried hot air to flow into the clothes/towels and then carries the moisture away from the clothes/towels. If the lint has blocked the filters, the moist air cannot be removed from the chamber effectively. This will reduce the drying efficiency and the dryer will require more energy and time to dry the clothes/towels.

Sunday, 3 May 2015

Unboxing WD Elements USB 3.0 1 TB

I wanted to buy another external hard disk to store my data and photos. I have 3 internal hard disks that I run my operating system and another 1 TB WD old external disk. This WD disk has been partitioned into two formats, one with Mac and the other is NTFS Windows Format.

The old WD disk is a 3.5"' external hard disk which requires a power supply. It is big and bulky. I would like something that does not require an external power supply and is USB 3.0. So, I have decided on the WD Elements USB3.0 1 TB 2.5" external hard disk. I went to hardwarezone to compare the prices of the WD Elements disk from different shops and Cybermind seems to be the lowest at $79 including GST.

I went to buy it on Thursday and the shop attendant said that I should run it for 30 days without registering the warranty online. If the disk has issues within the 30 days, Cybermind will replace it one-for-one. After 30 days, you can register online.

The WD Elements portable storage comes in a box. Unboxing is easy and the disk is protected in another packaging in the box. After unboxing, you can find the documentation for warranty, the USB3.0 cable and the disk. Nothing fancy in there.

It is very light and I plugged the USB3.0 into my Mac USB3.0 port. It connected immediately. I cannot copy the OSX files over as the disk is in NTFS format. There are some files in the disk. There is a WD Smartware Pro Free Trial. I copied all the files to my Mac and then format the disk to Mac OS Extended (journaled) using the Mac Disk Utility application. Later I learned that you can buy the Paragon NTFS for Mac 12 software to remove the barriers between HFS and NTFS. Once installed, you can create, delete and modify any files and folders on a NTFS formatted drive. Well, too late, I have formatted my disk to Mac OS.

I copied a 143 GB folder from my Mac to the WD Elements disk and it took 24 minutes using the USB3.0 connection. I'm not sure whether this is fast or slow. But I think it is satisfactory. There is no sound from the disk. 

The Box
The box
Back of the box
Back of the box
Opening the box
Opening the box
Content of the box
Content in the box
Harddisk & Cable
Harddisk & Cable
The disk
The disk
The Port
The port
USB3.0 cable
USB3.0 cable
Backward compatible with USB2.0

Monday, 27 April 2015

Google AdSense Alternative - Chitika

I had started putting Chitika ads in my blogs since Nov 2014. Initially, I had about $0.01 to $0.03 revenue per month from Nov 2014 to Feb 2015. After Feb 2015, I did not receive any revenue even though I had similar impressions (average 850 impressions per month). I did not get any valid clicks since Mar 2015. Below is the Advanced Report from Nov 2014 to Apr 2015. I had given Chitika a go for at least half a year already and the results were disappointing. My revenue is $0.08 for half a year. Even if I continue with Chitika on my blogs, I don't think I will be able to reach $1 for 10 years. This is one of the worst ads networks that I have used. I wouldn't recommend this unless you have a lot of valid clicks from the US traffic. The Asian or European traffics that I have generated did not give me enough impressions and valid clicks that materialized into revenue.

Chitika ads almost took half of the ads that I have in all my blogs. I will gradually reduce the ads and put more from revenue generating ads networks.

Chitika Report - SG My Life Is Good
Chitika Report - Nov 2014 to Apr 2015
The default channel gave the most revenue or rather all the revenues came from the default channel! No revenue from mobile ad, highlight and hover app.
Chitika report - Channel
Chitika Report - Channel
I'm not complaining on the revenue because I know that my traffic is mostly from Asia. However, recently, my blogs are gaining traction with traffic from US. I should be looking at some revenues from the US because in my other ads networks, there are already revenues from the US traffic. I'm wondering why Chitika does not reflect this. Should I email Chitika to check with them?

I have not checked my "https://publishers.chitika.com/ads/settings" for quite some times. Today, I click on the settings and see My Domains. I have two domains which under the DTL column are showing gold-pending level domain. Most of my domains are silver levels and only one is bronze. I have no idea when they have been gold-pending as I have not clicked on the My Domains for at least 2 months. Let's say it is in gold-pending level today (7 May), I want to see how long does this take to reach gold level domain. Even if it is gold level domain, I wonder when it will drop to silver level.

gold-pending level domain
Gold-pending level domain

Wednesday, 22 April 2015

Ordered my Raspberry Pi 2 and accessories

Finally, there are stocks for the new Raspberry Pi 2 Model B at RS Components. I ordered one this morning together with one Edimax Wireless Nano USB Adapter and one Raspberry Pi B+ White Case.

The Edimax Wireless Nano USB Adapter and White Case are available for same day despatch, so I got them in the afternoon just now. Pretty fast I must say, however the Raspberry Pi 2 will probably take a couple of days to be delivered. I hope the Pi can be delivered by this Friday so that I can play with this toy during the weekends. I still need to get the MicroSD card as I only have SD cards. I decided to upgrade as the Pi Model B is already 3 years old and is a bit slow to run the programs. The new Pi 2 has 1gb ram and faster 900MHz quad core processor. It has 4 USB slots which are very useful to run many dongles and memory stick. I will need one for wifi, bluetooth, keyboard and USB thumb drive. So, I will be using all the 4 USB slots and I wonder whether the power supply can support this.

I have the bluetooth dongle that I bought from eBay last year. This one is working with Raspbian I think but it is not detected in Openelec XBMC. I remembered there was one version of the older XBMC that detected the adapter but after I had updated to the latest, the adapter was not supported or rather bluetooth support is not well developed for XBMC. In the Kodi version, it is not detected. I will try with the Raspberry Pi 2 setup and update in this blog whether it is supported.

I plan to buy a Pi Camera but it is out of stock till 6 June. I intend to use it as an IP camera but I'm not sure whether it can stream realtime video.


Raspberry Pi 2 White Casing
Raspberry Pi 2 White Casing.
The inside of the casing as shown below. There is a slot of the Pi Camera module. It will stick out of the box and you will not be able to cover it. Not really what I have expected if I want to add a camera to it. I will prefer an external holder or cover for the camera which can be positioned in the direction that is required.
Inside of the White Casing
Parts of the Raspberry Pi 2 White Casing
I had this Edimax nano wireless USB adapter in my Raspberry Pi Model B and is still working fine. I chose this because I know that this is one of the working dongles and I'm not willing to fork out some bucks to test other brand. I tested the new Edimax adapter yesterday night and it is working fine. You will need to go to the menu to de-select the wireless connection and reconnect again. When you just removed the existing dongle and replaced the new dongle, it will not detect. So, you have to manually deselect and select the wireless connection again. Just in case, you have similar problem, this will help you solve it.
Edimax Nano Wireless USB Adapter
Still waiting for my Pi 2 to arrive.

The Pi 2 did not arrive yesterday as stated in the RS delivery schedule. It mentioned delivery within 3 days upon ordering. I called up the Customer Service hotline and a lady checked and told me that the stocks did not reach their warehouse as expected. The stocks will only arrive this coming Monday and the earliest delivery date will be Tuesday. I think RS is competing with other authorized dealers and claimed that the order can be fulfilled within 3 days and many people would be ordering from them thinking into account the short delivery time. I hope the stocks will arrive on Monday but I'm not very convinced that I will receive the Pi 2 on Tuesday as there will be couple of hundreds or even thousands of orders and deliveries needed to fulfill. Just hope for the best.

While waiting for the Pi 2 to arrive, I went to buy a MicroSD card with adapter. I was at Westgate and Jem yesterday to catch the Avengers: Age of Ultron. I would normally get my cards from Sim Lim Square as it would be at least $3 cheaper. I do not have the time to go SLS, so I went to the Challenger shop to buy one.  Saw this Kingston 16GB MicroSD card with Adapter @ $18.90. It has a 90MB/s read and a 45MB/s write speed. Not sure how true but settle with this.
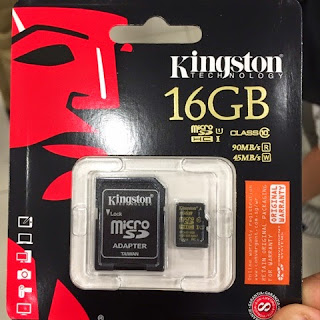
Kingston MicroSD card with Adapter
I was expecting the delivery to be on Tuesday. I received an "Enhanced Notification - Despatch" email from RS Components that the order had been despatched on Monday. The courier arrived at around lunch time. The Pi 2 is pretty small as compared to my earlier Model B+. My colleagues were quite fascinated with this device. I told them that the price is about S$47 and they think that there might be copies of this in the TaoBao. I would think that even if there are copied versions, I don't think the software supports are available and extensive as the original. It is already very cheap and I don't think getting two of these. But I think I will reserve the next purchase for the Pi camera or an upgraded version.
Raspberry Pi 2
Pi 2 delivered to my office
Even though I have played with the Pi before, it is still liked having the Pi for the first time. I placed the Pi 2 into the white casing but it did not fit well. I think something was wrong and quickly figured out that I needed to place the Pi 2 into the baseplate first. This was because there were two latches that the Pi 2 needed to go under. I had placed the Pi 2 onto the cover instead of the baseplate. If you had placed it correctly in the baseplate, you could snap fit the cover over the baseplate. I think after you had snapped the cover/baseplate, the interlock would be tight and you might not remove the cover easily.

After the assembly, I inserted the wifi and keyboard dongles. I plugged in the LAN cable and then the USB keyboard. I inserted the MicroSD card (that I had preloaded with the Openelec XBMC Kodi image). The fitting is just nice and the MicroSD card can be removed easily. My friend had an issue with the MicroSD slot on the same white casing and he had to cut a portion away with a penknife. I plugged in the MicroUSB cable and used my iPad 2 power plug. Switched on the power and Kodi XBMC was up and running in less than 5 minutes. Installed the Add-ons that I needed and I'm now thinking what to do with the old Pi...
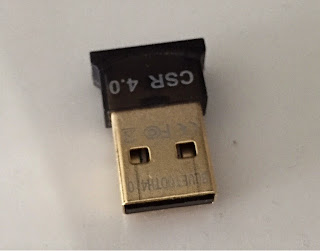
Bluetooth dongle (not working with Kodi)
USB ports
USB ports - taken up by Edimax, Keyboard, Thumb Drive
Power port, HDMI and audio jack
Inside of the casing
MicroSD card slot
MicroSD card slot

Microsoft just released a Windows 10 IoT core insider preview image for Raspberry Pi 2. You can go to https://connect.microsoft.com/ for more information.

Wednesday, 15 April 2015

Apple iOS 8.3 software update

To update or not to update to Apple iOS 8.3 is the question now. There are people who said that after updated to iOS8.3, the battery life became weaker and shorter. I'm quite reluctant to update now if there is no major problem to my iOS system. Will there be an iOS 8.3.1? Maybe by June, there will be iOS 9.0? Any comments from people who have updated to iOS 8.3? Thanks.

African Avocado

I saw the local supermarket selling these little small avocados from Africa. I had planted avocados from New Zealand but not from Africa. These avocados are smaller than the New Zealand or Australia. I left them for one day and the inside was already blackened. I think the avocados were damaged during transportation. They were selling at $3.95 for 3 avocados. The ones from Australia Avanza were bigger and at the same price. I took one from Australia and two from Africa. The idea is to grow a variety of avocados from different regions. Currently, I have 4 avocado plants from Avanza New Zealand and one Sunfresh Australia still in the water. The two African avocado pits are in the water now and next will be the Avanza Australia pit.

So, now, assuming all pits can grow into seedlings, I will have 8 avocado plants.

African Avocado Pit
After the toothpicks are inserted into the pit (but not too deep, I say, maybe 2 to 3mm into the pit), you need to make sure that the small bump area at the bottom is in the water and not the other way round. The top part should be round and without any bump. You can see a parting line around the pit dividing the avocado pit into half. When inserting the toothpicks, try to avoid this line. After two weeks or so, the pit will split along this line and root will emerge at the bump area in the water. When the root is about 1 inch long, a shoot may grow from the top. Change the water every 3 days or so. Sometimes, I change the water after one week. Place it near a place where it can get some indirect sunlight. 
Avocado pit in water

Friday, 10 April 2015

New avocado branch bending towards the light

New bud emerged and soon grew into a new branch. This is on my third avocado plant and from the second pruning. The shoot is red in colour and bends towards the window. I rotate the pot to face the shoot at the opposite direction. The shoot will straighten up and continue to grow upwards.

Branch bent towards light
I will let the new branch to have four leaves before I do the third pruning. The browning on the leaves seemed to be in control. I think it is due to insufficient watering that caused the browning. Another reason may be due to the water that I used. I didn't let the chlorine to escape from the tap water before watering. Now I will fill one 1.5L of tap water and rest it overnight before watering the avocado plants. Also, you need to make sure that water drains from the bottom of the pot when watering. Do at least one draining of the water per month. This will keep the browning of the leaves at bay. Another thing that I observed is that the second and third avocado plants have leaves that are drooping instead of leaves spreading out horizontally.